Draft of powershell script to sync information between prtg, netbox, ilo/idrac and vcsa, just to show the main ideas.

If we from the beginning tried to link all systems by serial numbers of physical devices, for example esxi server has consistent serial number attribute in all systems like prtg (for example for this we can use prtg Tags), netbox, ilo/idrac and so on, then we can run queries and auto sync data between the systems without tiresome manually syncs (mandatory to check that entered serial numbers are unique and registered in all systems properly). When we initially normalize all systems by enriching each of them by proper serial numbers, then we can create programmatically (using for example powershell modules) … Read the rest
Draft of powershell script to sync information between Veeam Backup and Replication and vcsa

Below you can find the sample of the script, which reads information about done backups from VBR server and writes it into custom attributes of each backed up VM in vcsa (considered that custom attributes are named as “05-last-backup”, “06-vbr-restore-points”, “07-vbr-job-options”; vcsa is named as  “vcsa.itforce.local”; VBR is named as “veeambr.itforce.local”)

To pre-create custom attributes for each VM in your vcsa:

connect-viserver vcsa.itforce.local
New-CustomAttribute -TargetType "VirtualMachine" -Name "05-last-backup"
New-CustomAttribute -TargetType "VirtualMachine" -Name "06-vbr-restore-points"
New-CustomAttribute -TargetType "VirtualMachine" -Name "07-vbr-job-options"

The script prerequisites:

  1. script easier to run directly from veeambr server.
  2. veeambr server should have network access to vcsa by 443 port
Read the rest

How to count traffic for each mailbox in Exchange

$yesterday=(get-date).adddays(-1)
$tomorrow=(get-date).adddays(+1)

$output=[pscustomobject]@{
DisplayName=""
sent = 0
recieved = 0
RecipientTypeDetails =""
PrimarySmtpAddress=""
}

$mailboxes=get-mailbox -ResultSize unlimited
foreach ($mailbox in $mailboxes)
{
$output.DisplayName=$mailbox.DisplayName
$output.DisplayName
$output.PrimarySmtpAddress=$mailbox.PrimarySmtpAddress
$output.PrimarySmtpAddress
$output.RecipientTypeDetails=$mailbox.RecipientTypeDetails
$output.RecipientTypeDetails
$output.sent=(Get-MessageTrackingLog -Start $yesterday -End $tomorrow -Sender (get-mailbox $mailbox).primarysmtpaddress -ResultSize unlimited).count
$output.sent
$output.recieved=(Get-MessageTrackingLog -Start $yesterday -End $tomorrow -recipient (get-mailbox $mailbox).primarysmtpaddress -ResultSize unlimited ).count
$output.recieved
$output| export-csv -noTypeInformation -append -path c:\temp\output.csv
}

Read the rest

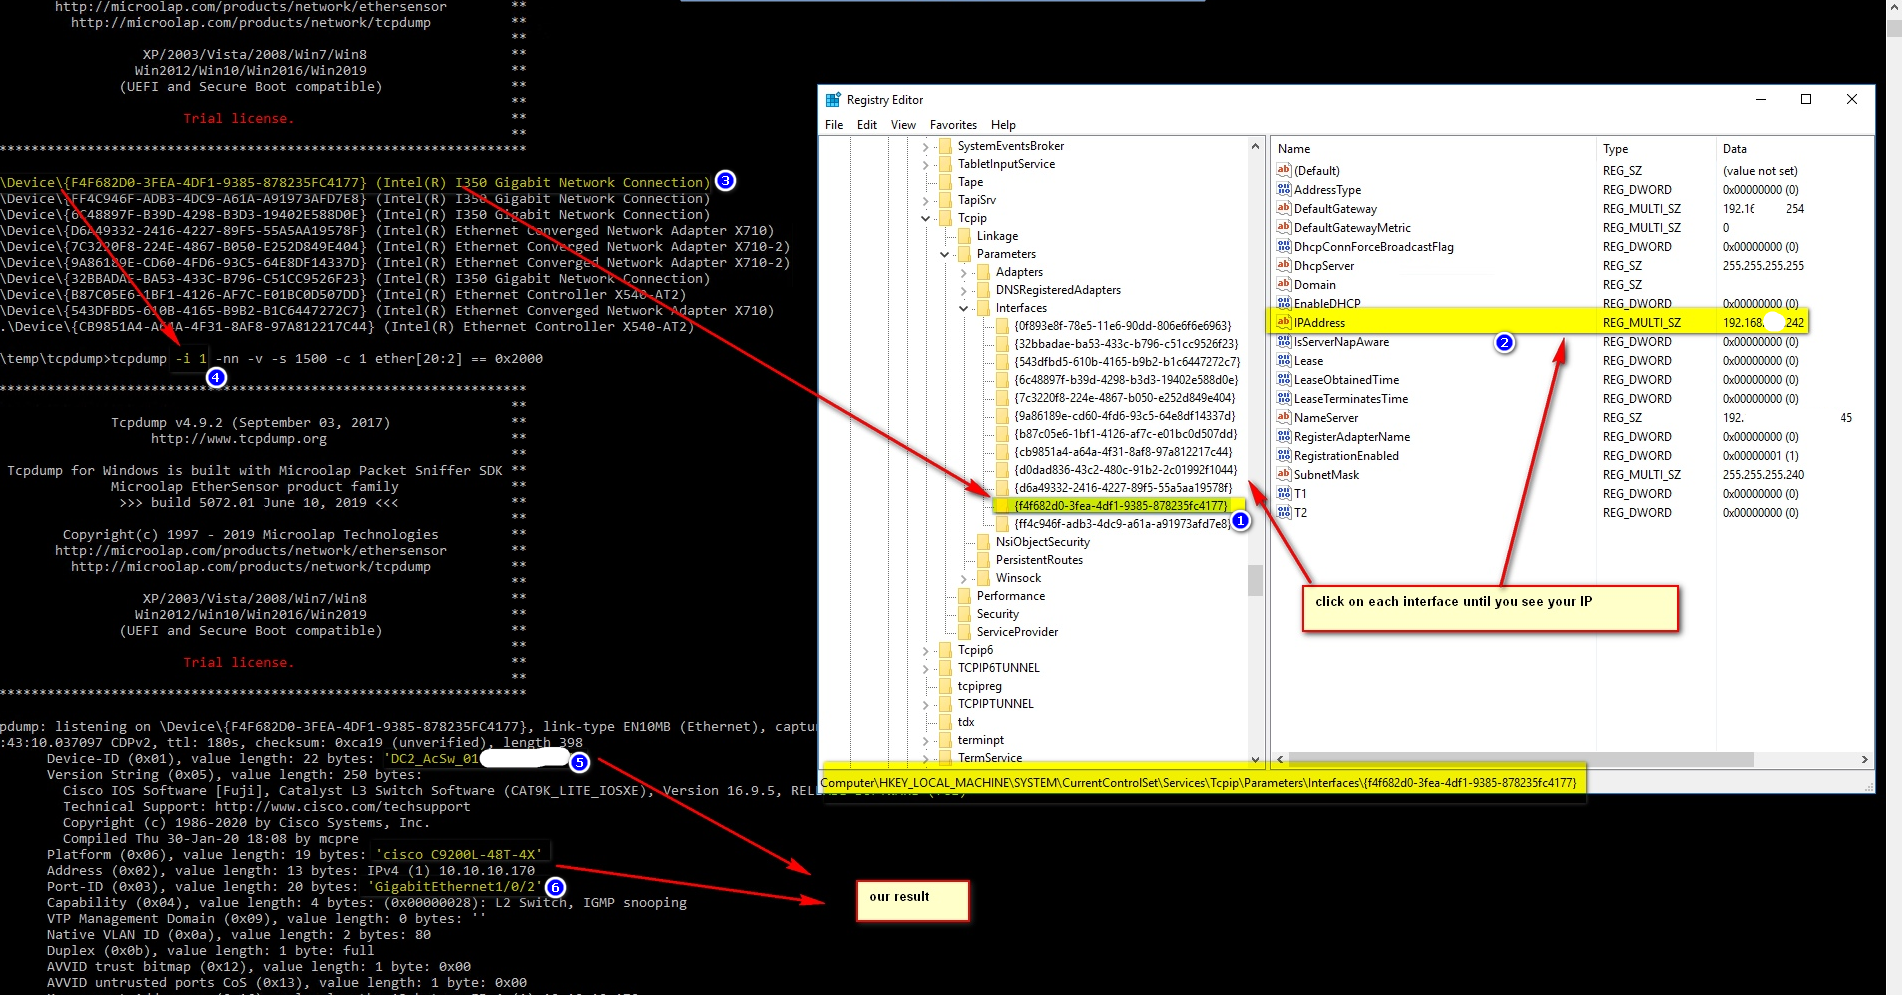
TRACE CABLES THE EASY WAY WITH CISCO CDP ON WINDOWS

Download tool from:
https://www.definit.co.uk/2010/02/trace-cables-the-easy-way-with-cisco-cdp-on-windows/

Example of usage:
Step1:

c:\temp\tcpdumptcpdump.exe -D

********************************************************************
**                                                                **
**              Tcpdump v4.9.2 (September 03, 2017)               **
**                   http://www.tcpdump.org                       **
**                                                                **
** Tcpdump for Windows is built with Microolap Packet Sniffer SDK **
**              Microolap EtherSensor product family              **
**               build 5072.01 June 10, 2019 <<<              **
**                                                                **
**        Copyright(c) 1997 - 2019 Microolap Technologies         **
**       http://microolap.com/products/network/ethersensor        **
**         http://microolap.com/products/network/tcpdump          **
**                                                                **
**                  XP/2003/Vista/2008/Win7/Win8                  **
**                 Win2012/Win10/Win2016/Win2019                  **
**               (UEFI and Secure Boot compatible)                **
**                                                                **
**                       Trial license.                           **
**                                                                **
********************************************************************

1.\Device\{F4F682D0-3FEA-4DF1-9385-878235FC4177} (Intel(R) I350 Gigabit Network Connection)
2.\Device\{FF4C946F-ADB3-4DC9-A61A-A91973AFD7E8} (Intel(R) I350 Gigabit Network Connection)
3.\Device\{6C48897F-B39D-4298-B3D3-19402E588D0E} (Intel(R) I350 Gigabit Network Connection)
4.\Device\{D6A49332-2416-4227-89F5-55A5AA19578F} (Intel(R) Ethernet Converged Network Adapter X710)
5.\Device\{7C3220F8-224E-4867-B050-E252D849E404} (Intel(R) Ethernet Converged Network Adapter X710-2)
6.\Device\{9A86189E-CD60-4FD6-93C5-64E8DF14337D} (Intel(R) Ethernet Converged Network Adapter X710-2)
7.\Device\{32BBADAE-BA53-433C-B796-C51CC9526F23} (Intel(R) I350 Gigabit Network Connection)
8.\Device\{B87C05E6-1BF1-4126-AF7C-E01BC0D507DD} (Intel(R) Ethernet Controller X540-AT2)
9.\Device\{543DFBD5-610B-4165-B9B2-B1C6447272C7} (Intel(R) Ethernet Converged Network Adapter X710)
10.\Device\{CB9851A4-A64A-4F31-8AF8-97A812217C44} (Intel(R) Ethernet Controller X540-AT2)

which of interfaces is our?
Step2:

Step3:
Now we know value for parameter -i

c:\temp\tcpdumptcpdump -i 1 -nn -v -s 1500 -c 1 ether[20:2] == 0x2000

********************************************************************
**                                                                **
**              Tcpdump v4.9.2 (September 03, 2017)               **
**                   http://www.tcpdump.org                       **
**                                                                **
** Tcpdump for Windows is built with Microolap 
Read the rest

How to get list of all AD users in AD group

To list all members of one AD security group:

Get-AdGroupMember -identity "Domain Admins" | get-aduser -Properties * | ft name, samaccountname, whencreated

To list all sec. groups of one AD user (member of what groups):

Get-ADUser -Identity [someone'-samaccountname] -Properties memberof|Select-Object -ExpandProperty memberof

To copy all groups from one AD user to other:

Get-ADUser -Identity [source-user-samaccountname] -Properties memberof|Select-Object -ExpandProperty memberof|Add-ADGroupMember -Members [target-user-samaccountname]

# all groups of [source-user-samaccountname] will be copied to [target-user-samaccountname]… Read the rest

Recommendations for powershell profile

As i showed in my post about creation of powershell profile you can add into profile your own frequently used functions.

I recommend to name them with permanent prefix. For example i create all my functions as moguy-cdp, moguy-esxi and so on.

In this case you don’t need to remember the name of your function to run, just start typing as moguy… and autocompletion will show you all your functions.

for example:

function moguy-vms

{

Get-VMHost | Get-VM | Select-Object Name, PowerState, NumCpu, MemoryMB, VMhost, @{N="Datastore";E={Get-Datastore -vm $_}}, UsedSpaceGB, ProvisionedSpaceGB, @{Name='ToolsVersion';Expression={$_.Guest.ToolsVersion}}, @{Name=’VMHostVersion’;Expression={$_.VMHost.Version}},Version, @{N="IP Address";E={@($_.guest.IPAddress[0])}},@{Name=’Cluster’;Expression={$_.VMHost.Parent}}, @{N="PortGroup";E={Get-VirtualPortGroup -VM $_}}, @{N="owner1";E={$_.customfields.item("owner1")}} | Export-Csv 
Read the rest

powershell script notification about expiration of password for AD user

#Import AD Module
Import-Module ActiveDirectory

#Create warning dates for future password expiration
$SevenDayWarnDate = (get-date).adddays(7).ToLongDateString()
$ThreeDayWarnDate = (get-date).adddays(3).ToLongDateString()
$OneDayWarnDate = (get-date).adddays(1).ToLongDateString()

#Email Variables
$MailSender = " Password AutoBot <password-alerter@itforce.com>"
$Subject = 'FYI - Your account password will expire soon'
$EmailStub1 = 'I am a bot and performed this action automatically. I am here to inform you that the password for'
$EmailStub2 = 'will expire in'
$EmailStub3 = 'days on'
$EmailStub4 = '. Please contact the helpdesk if you need assistance changing your password. DO NOT REPLY TO THIS EMAIL.'
$SMTPServer = 'smtp.itforce.local'

#Find accounts that are enabled and 
Read the rest

How configure ssh_config for windows openssh client, for example for PubkeyAcceptedKeyTypes=+ssh-dss

Since win10 you have openssh ssh.exe in

C:\Windows\System32\OpenSSH

So to use passwordless ssh connection you maybe need to provide ssh.exe “PubkeyAcceptedKeyTypes=+ssh-dss”

For this you can create ssh_config file anywhere (for example in c:\users\yourname\.ssh near your id_dsa private key file) with only one line:

PubkeyAcceptedKeyTypes=+ssh-dss

so now you can:

ssh yourname@1.1.1.1 -F "c:\users\yourname\.ssh\ssh_config"

where 1.1.1.1 for example your ssh server, san_switch, HPE virtual connect manager, nimble storage and so on

ps
the same is true for openssh server installed from home site on win2016 server
only ssh.exe file will be in
“C:\Program Files\OpenSSH-Win64” (by default installation)… Read the rest

Allow for new user of FC san switch to use passwordless access

on SAN switch run:

sshutil allowuser moguy
sshutil importpubkey

if your san switch cannot importpubkey, in other words access back to your windows admin workstation over wcp for pub key file due to the lack of firewall access, then download openssh package and install it on windows pc in the storage array environment/subnet, copy to c:\users\moguy\.ssh\ folder of this jump server/adminpc id_dsa.pub and using sshutil importpubkey download/import/install pub key from this openssh server (not from originally generated admin workstation). For example if you installed openssh on windows with 1.1.1.1:22, then:

san_switch_00:moguy@itforce.local> sshutil importpubkey
Enter user name for whom key is 
Read the rest

Generate pub and private ssh keys for passwordless ssh access

in the linux (for windows users i highly recommend to install WSL2 with shared C and D disk file system among win10 and ubuntu; your existing network firewall ACL of main admin workstation to brocade is enough, WSL will NAT your linux) run below command:
ssh-keygen -t dsa
Generating public/private dsa key pair.
Enter file in which to save the key (/home/moguy/.ssh/id_dsa):
/home/moguy/.ssh/id_dsa already exists.
Overwrite (y/n)? y
Enter passphrase (empty for no passphrase):
Enter same passphrase again:
Your identification has been saved in /home/moguy/.ssh/id_dsa.
Your public key has been saved in /home/moguy/.ssh/id_dsa.pub.
The key fingerprint is:
SHA256:NW9kX0RJNKDza22347348734123984794721ppqXegwtY moguy@ws008-101.itforce.local
The 
Read the rest